Information on the most widely used ASTM standards within the materials testing industry
Model: YYU
Electronic extensometer is an electronic measuring instrument used to accurately measure the small deformations (elongation or shortening) of materials during loading. It is widely used in testing the mechanical properties of materials (such as tensile, compression, bending, fatigue tests) and is a key tool for evaluating material properties such as elasticity, plasticity, and strength. By converting mechanical deformation into electrical signals, it achieves precise digital measurement of strain and is one of the core devices in modern materials mechanics testing.
General introduction
Electronic extensometer is an electronic measuring instrument used to accurately measure the small deformations (elongation or shortening) of materials during loading. It is widely used in testing the mechanical properties of materials (such as tensile, compression, bending, fatigue tests) and is a key tool for evaluating material properties such as elasticity, plasticity, and strength. By converting mechanical deformation into electrical signals, it achieves precise digital measurement of strain and is one of the core devices in modern materials mechanics testing.
Core Applications:
1, Measure the axial/transverse deformation and strain of materials under tensile, compressive, bending, and other loads, and calculate key mechanical parameters such as elastic modulus E, specified plastic elongation strength Rp, Poisson's ratio μ, and elongation.
2, Plot accurate load-deformation/stress-strain curves, providing data support for material development, quality control, and structural design.
3, Compatible with various mechanical testing machines, used for static/dynamic mechanical performance testing of metals, polymers, composites, and other materials.
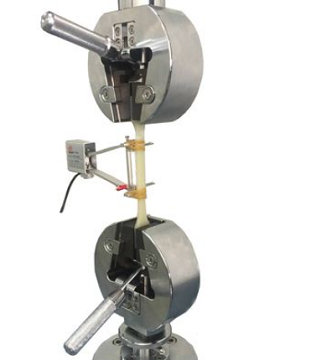
| In a tensile test | Extensometer can be used to measure the deformation corresponding to the material's yield point and tensile strength, and to calculate parameters such as elastic modulus and Poisson's ratio; |
| In a fatigue test | Extensometer can monitor the accumulated deformation of the specimen under alternating loads to determine whether the material has entered the plastic stage or is approaching fracture. |
Working Principle (Strain gauge type):
Mechanical deformation → Sensor element deformation → Electrical signal change → Amplification/processing→ Digital output
Sensing Deformation: Attach the strain gauge to the gauge section of the specimen. The deformation of the specimen drives the deformation transmission rod and the elastic element of the strain gauge to deform.
Electrical Signal Conversion: The strain gauge on the elastic element undergoes a resistance change with deformation. A Wheatstone bridge converts this resistance change into a weak voltage signal.
Signal Processing: The voltage signal is amplified and filtered by an amplification circuit, then converted into a digital signal by the data acquisition system, and finally calculated into deformation and strain values.
Data Output: The output deformation/strain data is synchronized with the load data, used for curve plotting and parameter calculation.
Key Parameters:
1. Gauge Length (L₀): The initial distance between the two measuring heads of the extensometer, which serves as the reference length for measuring deformation (e.g., 5mm, 10mm, 25mm, etc.). It should be selected according to the sample size and testing standards (for example, 25mm or 50mm gauge length is commonly used in metal tensile tests).
2. Measurement Range: The maximum deformation that the extensometer can measure (e.g., ±1mm, ±5mm). It should match the material's deformation capability (use a small range for brittle materials and a large range for ductile materials).
3. Accuracy Class: Usually 0.5 or 0.2, representing the deviation range between the measured value and the true value (for example, class 0.5 indicates an error ≤ ±0.5%).
4. Resolution: The smallest detectable deformation (e.g., 0.1 μm). The higher the resolution, the better the ability to capture minute deformations.
Common types and application scenarios:
| Type | Features: | Applicable scenarios |
| Axial extensometer | Measure axial deformation, fixed gauge and high accuracy | Tensile test of metal/composite materials, elastic modulus, elongation measurement |
| Lateral extension meter | Radial contraction is measured, often in conjunction with an axial extensometer | Poisson's ratio determination, lateral deformation study of materials |
| Clip-on extensometer | Easy to install, automatically detached when broken | Fracture mechanics test, fracture toughness test of brittle materials |
| Fully automatic extensometer | Automatic calibration distance and clamping, high efficiency | Batch quality inspection, high-frequency material testing, reduce human error |
Key Features
1. For the extensometer, first insert the positioning pin into the locating hole;
2. Hold the upper and lower ends of the extensometer with two fingers, and place the midpoint of the upper and lower jaws in contact with the specimen (the part to be measured). Fix the upper and lower jaws of the extensometer onto the specimen using the spring clamp or rubber band;
3. For the extensometer: remove the gauge length clip; remove the positioning pin; (Note: be sure to check before the experiment to avoid damaging the extensometer)
4. In the test machine control software's "Experiment Condition Selection" interface, choose the deformation measurement method: select curve tracking mode as Load-Deformation Curve;
5. Zero the extensometer signal display;
6. Select the amplifier attenuation range according to the magnitude of the deformation to be measured. Generally, plastic manufacturers choose a force below 1T, metal manufacturers choose 10T. Copper rods and aluminum tubes have larger forces.
High-precision strain measurement: resolution up to 0.1 microstrain (μm/m).
Real-time data output: synchronized with the testing machine control system.
Wide measurement range: typically ±10% to ±50% strain.
1, Gauge Length Matching: Choose standard gauge lengths such as 25mm or 50mm according to the type of specimen (e.g., metal sheets/bars). Non-standard specimens require customized adaptation.
2, Installation Specifications: Ensure the blade is perpendicular to the specimen with no slipping, and avoid excessive installation force that could damage the specimen or the extensometer.
3, Range Selection: The deformation should not exceed 80% of the extensometer's range to prevent overloading damage to the elastic elements and strain gauges.
4, Regular Calibration: Calibrate regularly according to standards such as JJG762 to ensure measurement accuracy. The calibration cycle is usually 1 year.
![]() |
| Extensometer calibration device |
5, Maintenance: Avoid drops and collisions, and store in a dry environment; after testing, clean the blade and check that the strain gauges and leads are intact.
1. No signals: Using resistance meter to test the resistance between signal connection and Bridge pressure connection (see pictures below), which should be 350Ω approx. The other connections between bridge pressure connection should be 280Ω approx. Otherwise, Please check whether there is disconnection.
2. Signal fluctuating: Using resistance meter (20Mωscale) to test resistance of extensometer surface to any connection, There should not be short circuit.
3. Bad repeatability: Please check with tightness of fixing screw, or the damage on the knife-edge.
4. Over Wide of Zero point: Please use a proper scale distance, or check whether the knife-edge loose.
The choice between a large-deformation extensometer and a small-deformation extensometer mainly depends on the characteristics and requirements of the test object. A large-deformation extensometer is suitable for objects with large deformation and low strength.
For example, it is used to test rubber, plastic, and similar materials. A small-deformation extensometer is suitable for objects with small deformation and high strength. For example, it is used to test steel, aluminum, and similar materials. Therefore, selecting a large-deformation or small-deformation extensometer should be evaluated based on the actual application and the characteristics of the test object to ensure testing accuracy and effectiveness.
ASTM E83: Standard Practice for Calibration, Verification, and Classification of Extensometer Systems
ISO 9513: Metallic materials — Calibration of extensometer systems used in uniaxial testing
GB 12160: Metallic materials-Calibration of extensometers systems used in uniaxial testing

Main technical specification
Accuracy class | Level 0.5 |
| Strain Resistance | 350Ω |
| Voltage | less than 6V (AC/ DC) |
| Output Resolution | 2mV/V |
| Scale gauge distance | 20~200mm (common 50mm, 100mm) |
| Max elongation range | 5, 10, 25mm |
| Output Connection | 4 or 5 phase |
Key Application Areas of Extensometer
1. Metal Material Testing
Steel: Yield plateau measurement
Non-ferrous metals: Precise determination of elastic region
High-temperature alloys: Used with high-temperature furnaces
2. Polymer Materials
Plastics: Large strain measurement (requires large deformation extensometer)
Rubber: Superelastic deformation measurement
Films: Deformation under very small force values
3. Composite Materials
Anisotropic strain measurement
Interlaminar shear testing
Requires multi-axial extensometer
4. Special Testing
Low-cycle fatigue: Cyclic strain control
Creep testing: Long-term small deformation
Crack propagation: Opening displacement measurement
Require More Customized Solutions?